How to Import EML to Windows Live Mail & Locate WLM File Storage?
Are you wondering how to open EML files in Windows Live Mail, Windows 10 Mail or Windows Mail? Now, no need to worry anymore. We will help you to import EML files to Windows Live Mail as well as also suggest the solution to restore EML files to Windows Live Mail.
Overview to Windows Live Mail?
Windows Live Mail is one of the most popular email application for Windows 7 and above users. Windows Live Mail is formerly known as Windows Live Mail desktop which is offered by Microsoft. It is a free email client and provides free emailing service to users by installing it on Windows 7, Windows 8 and also compatible with Windows 10 edition. The email client stores all its emails in .eml file extension.
How to Import EML Files to Windows Live Mail?
Let us first know about how to Import EML files to Windows Live Mail. It will be helpful for you in that when you get EML files from someone but don’t know how to open EML files in Windows Live Mail. Just follow the simple step-by-step guide to import EML files in Windows 10 Mail or Windows Live Mail.
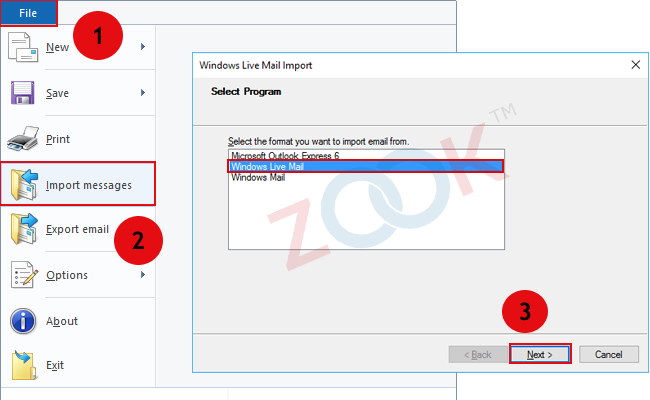
Step 1: Firstly, launch Windows Live Mail in your system.
Step 2: Now, click on File in menu >> choose Import Messages >> Select Windows Live Mail.
Step 3: Click on Browse button to see emails and click on Next.
Step 4: Here you can also select all folders or choose a specific folder and press Next button.
Step 5: Now, the process will start and selected folders will get import/export.
Step 6. Last step is to click on Finish button.
With these simple steps, you can easily import EML files to Windows Live Mail. This will help you to restore EML files to Windows Live Mail. Now, you can easily access your all selected EML files or EML folder in Windows Live Mail.
How to Locate Windows Live Mail Folder in Windows?
Now, in today’s era there are wide range of choice are available for users to manage their emails. Due to various advance features of another email client, lots of users make their mood to switch from Windows Live Mail to another email application. If you are also one of them and interested to transfer emails from Windows Live Mail, then you need to first know about the default storage file location of Windows Live Mail. Therefore, here all simple steps are described below which helps you to export files from Windows Live Mail.
To locate Windows Live Mail folder, users must ensure that you have properly installed and configured Windows Live Mail account in your system.
Step 1: Launch Windows Live Mail in your system.
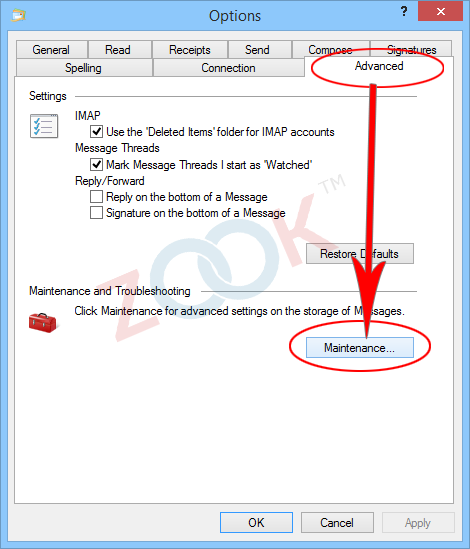
Step 2: Go to File >> Choose Options >> Select Mails.

Step 3: Now a new window opens, you need to choose Advanced tab and then select Maintenance under Maintenance and Troubleshooting.
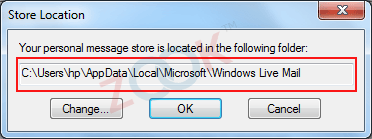
Step 4: A Maintenance window opens, click on Store Folder…
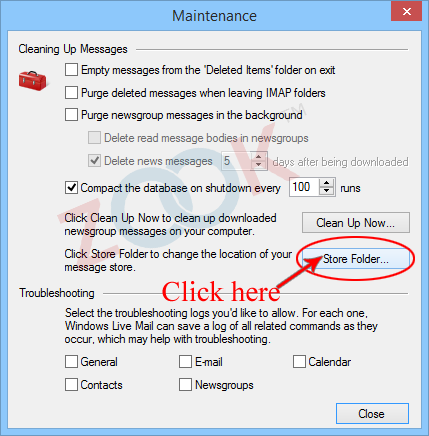
Step 5: Now, you get your Windows Live Mail storage location.
Get a direct file storage path of Windows Live Mail for different Windows edition by clicking on start and select Run and type the following path.
- Default Storage Location of Window Live Mail: C:\ Users \ %UserProfile% \AppData \ Local \Microsoft \Windows Live Mail.
- Windows 10 Location: – C:\ Users \ Username \ Appdata \ Local \ packages \microsoft.Windowscommunicationsapps \ Localstate \ Indexed \ Livecomm \ any folder name\any folder name \ mail
- Location in Windows 8, Windows7, Windows Vista: C:\ Users \<User Profile>AppData \ Local \ Microsoft\
- Windows XP: – C:\ Documents and Settings \ username \ Local Settings \ Application Data\ Microsoft \ Windows Live Mail
From all these locations for different Windows edition, users can easily get their Windows Live Mail storage location. Here, you get all your emails in a single folder. So, just choose your Windows Live Mail email folder and move emails from Windows Mail to any of the desired email client.
You can also try EML to PST converter for accessing Windows Live Mail data in Microsoft Outlook.