How to Configure Microsoft Outlook to Add Email Account?
Get the complete guide to set up an email account in Microsoft Outlook. To configure Microsoft Outlook by using any email account, it is required to have your email address and its password. This article explains the complete installation and configuration of Outlook.

What is Microsoft Outlook?
Microsoft(MS) Outlook is the personal information manager facilitates by Microsoft. It is part of the Microsoft Office Suite which is widely used as the Email Application. It offers several advance features to users to manage their email data such as email messages, contacts, notes, tasks, calendars, journals and much more. There are several Outlook versions are offered by the Outlook such as Outlook 2003, 2007, 2010, etc. Most of the users widely used Outlook 2013 as their email application. Now, MS Outlook 2016 is available for users which came up with many advance features. Moreover, Outlook offers to add multiple email accounts by using Outlook’s “Add Account” option. It has secured authentication which allows user to send and receive emails securely.
Process to Configure Microsoft Outlook
To set up an email account in Outlook, there are two methods are available for users i.e. Manual Setup and Auto Account Setup.
Configure E-mail Account Using Auto Account Setup Method
Follow the described steps to add an email account in Microsoft Outlook by using the auto account setup method.
- Open Microsoft Outlook, click on File >> Info >> Account Information and click “Add Account”.
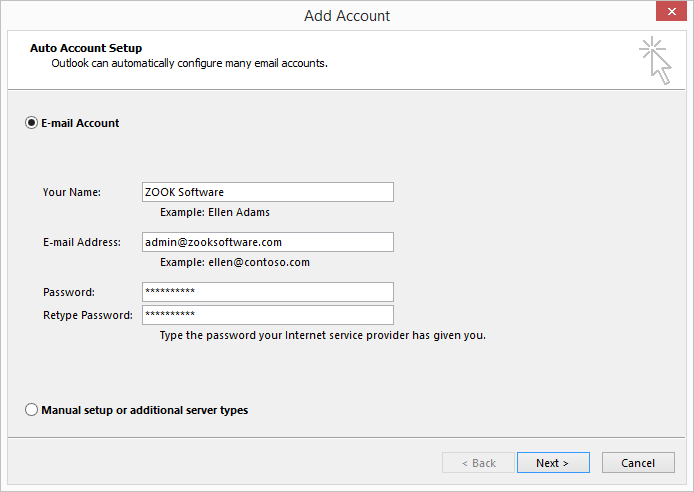
- A new pop up window “Add Account” will open and asks you to add the required information.
- In Your Name box, users need to enter the name as they want to appear to recipients.
- In E-mail Address box, fill your email ID.
- Now, enter the Password, and Retype Password and click on Next button.
- Now, click on Finish and your email address is successfully configured to Outlook.
Configure E-mail Account Using Manual Setup Method
In manual setup, users must have server information which consists of Account Type i.e. POP3 and SMTP, incoming mail server and outgoing mail server(SMTP), User Information consists of email address and your name and in the Logon Information requires email address and password for the email account.
This method consists of various steps which is step-wise-step described below: –
- Now again open Outlook, and click on File >> Info >> Account Information and click on “Add Account”.
- In “Add Account” wizard, click on Manual Setup or additional server types and click on Next to setup an account through manual method.
- Now, choose service as POP or IMAP and press Next button which opens.
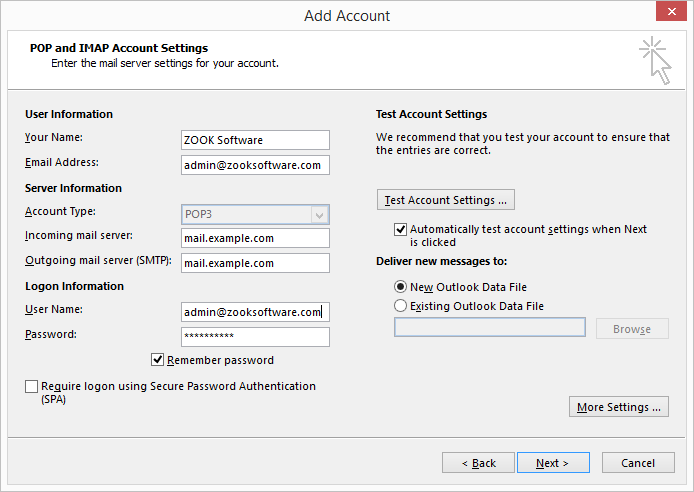
- Now, add all the required fields such as user information, server information, and logon information as described below to add Email account: –
- Your Name: Enter the name which you want to appear to recipients.
- Email Address: Enter the email address which you want to reply the message. It is also a contact address which is saved by your friends to send/receive emails.
- Account Type: Select POP3 or IMAP Account. Here, choose Account Type as POP3
- Incoming Mail Server: Type the name of your IMAP4 server.
- Outgoing Mail Server (SMTP): Enter the name of your SMTP server. To avoid authentication error, use SSL and port 465 for SMTP connections.
- Username: Enter the complete email address in the user name field.
- Password: Enter your email password in this field.
- Now click on More Settings…
- In Internet Email Settings, click on Outgoing Server tab and check the box named My Outgoing server (SMTP) requires authentication.
- Now in Advance Tab, use 110 as POP3 port and 587 as SMTP port.
- Click on the Test Account Settings… button and check the configuration is done properly. Users need to ensure that all items are with green marks. Click on Close button to close the test Windows
- Click on OK to save your settings.
Also Read: How to Configure Gmail ID in Outlook in Simple Steps?
Note: – The procedure discussed above is tested on MS Outlook 2016. But you can use the same procedure to set up a new email account and configure Microsoft Outlook of any version.
Finally, an email account has been successfully added to your Microsoft Outlook. By using these simple steps, users can easily add multiple email accounts to Outlook and access the several email accounts in MS Outlook.
In any case, if you want to transfer Outlook data to another computer, then you need to use the most trusted third party tool OST to PST Converter. It allows you to move Outlook data in another computer without any hassle.